How Professional Fence Installation Keeps Your Yard Looking Normal (Faster Than You Think)
Your neighbor mentioned their new fence project, and suddenly you’re wondering if getting that backyard privacy barrier means weeks of torn-up lawn, muddy boot prints across your patio, and piles of dirt everywhere. The good news: professional fence installation typically wraps up in just 2 to 5 days of active work, with the heaviest disruption concentrated in a narrow strip along your fence line.
In Connecticut and New York, crews manage deep frost-line requirements, local zoning rules, and underground utility locations in a tight sequence designed to get you back to normal yard use quickly.
Most homeowners find that the loudest, messiest phase happens mainly on the first day or two, then shifts to detail work that barely affects the rest of the property. When you understand how pros choreograph layout, digging, curing, and cleanup, the whole process feels far less invasive than you might expect.
Key Takeaways
- Most Yards Are “Torn Up” for Just a Few Days: Typical residential projects of 150 to 200 feet often finish on-site in about 2 to 5 days, with the noisiest digging concentrated in the first 1 to 2 days.
- Prep Work Minimizes Surprises and Extra Mess: Calling 811 before digging, checking zoning rules, and laying out the path ahead of time reduce mid-project changes that extend how long your yard feels disrupted.
- Panels and Gates Come After the Messy Part: Once posts are in and curing, crews mainly work along the fence line to hang panels and adjust gates, so most of your yard returns to normal use quickly.
- Permits and Rules Shape the Timeline, Not Just the Yard: Connecticut and New York zoning and building codes add lead time for approvals and depth requirements but help avoid fines, rework, and neighbor disputes.
- Cleanup and Walkthrough Restore the Yard: Professional installation includes debris removal, basic surface restoration, and a final walkthrough so the site looks finished when the crew leaves.
Why Professional Fence Installation Matters in Connecticut and New York
Professional fence installation matters because regional codes, frost depth, and homeowner safety requirements all shape how long your yard stays open and how often it needs to be disturbed later. Professionals who know the local landscape can plan around these factors from the start, cutting down on delays and callbacks.
Local Fence Environment and Homeowner Concerns
Connecticut and New York building codes set minimum frost depths and structural expectations for exterior supports, so post placement and footing design must match local climate realities.
Neighborhood factors such as corner sight triangles, proximity to wetlands, and property line expectations influence where crews can dig and how much of the yard needs to be accessed. Local zoning offices often require setbacks from lot lines or special clearances near driveways, and pool barriers must meet specific height and gate requirements. Professionals coordinate all these constraints up front so they can commit to a layout that doesn’t need revision halfway through the job. That kind of planning is what keeps equipment off your lawn and holes open for the shortest possible time.
National vs. Connecticut and New York Yard Disruption and Timelines
National residential fence timelines often assume milder climates and simpler zoning, while Connecticut and New York projects must contend with deeper frost lines, more curing time, and stricter local rules. Understanding these differences helps set realistic expectations for how long your property will feel like a work zone.
Typical Timeline Ranges by Fence Length
Many national “standard” projects finish active installation in about 1 to 3 days for a 150-foot fence on flat ground. Those estimates generally assume shallow post holes, minimal curing periods, and straightforward access. In Connecticut and New York, the same basic project often runs 3 to 5 days on-site to account for deeper post holes, curing windows dictated by cold-weather concrete performance, and any permit or inspection alignment. The extra time doesn’t mean your entire yard is upside down for longer; it mainly reflects waiting periods where posts need to stabilize before crews hang panels.
Longer runs, sloped terrain, or complex features like pool enclosures can add another day or two, but even then the heavy earthmoving phase remains short. Professionals stage materials and tools efficiently so that once digging is done, the project shifts into assembly mode, which feels far less invasive.
Day-by-Day Disruption Models
Day 1 often focuses on layout, utility confirmation, and post-hole digging, which is the period when your yard looks most torn up along the fence line. Crews verify underground utilities marked by 811, stretch string lines to confirm alignment, and then use augers or manual diggers to excavate holes in a controlled path. Soil piles, equipment, and foot traffic are concentrated in this narrow corridor, leaving the rest of your lawn untouched.
Day 2 typically sees posts set and braced. Concrete is poured around each post and allowed to begin curing, which may take 24 to 48 hours, depending on temperatures and mix. During this curing window, the yard isn’t under continuous heavy use; crews may leave to work on another job or pause to let the footings stabilize. Days 3 to 4 focus on panels and gates, with cleanup and walkthrough at the end so the yard transitions back to normal use. The actual “torn up” feeling is largely limited to that first day or two when holes are open, and soil is piled beside them.
Key Steps That Limit How “Torn Up” Your Yard Feels
Each major step in a professional installation is designed to concentrate disturbance into a controlled corridor and avoid repeat digging. By sequencing work carefully and respecting regional requirements, pros keep the project moving without spreading mess across your entire property.
Site Preparation and Layout
Calling 811 and following federal damage-prevention guidance ensures buried utilities are marked so post holes and access routes can be planned precisely, limiting exploratory digging. New York’s 811 system reminds homeowners to contact the one-call center several days before digging, giving utility companies time to send locators. Once lines are marked, professionals know exactly where they can safely excavate and where they need to adjust post spacing or shift the alignment slightly. This step prevents mid-job surprises that would leave holes open longer or require rerouting equipment across your lawn.
Layout work, including string lines, stake placement, and zoning setback confirmation, happens before heavy excavation, which keeps “move that line over” changes from stretching the messy phase. Reputable installers verify property boundaries and check local height limits or sightline rules so the design is locked in before the first shovel hits dirt. That preparation might add a few hours to the project schedule, but it saves days of backtracking and rework that would keep your yard disrupted far longer.
Post Setting, Frost Depth, and Curing
Frost heave happens when moisture in the soil freezes, expands, and pushes posts upward, causing fences to lean or panels to pop loose. Setting posts below the frost line and using concrete footings prevents that movement, which means crews set things once and don’t have to come back next spring to reopen holes.
Industry practice is to allow 24 to 48 hours (sometimes up to 72) for concrete to cure, meaning posts are set once and left to stabilize rather than being disturbed later, which would reopen the yard. During the curing window, only the immediate area around each post is restricted. The rest of your lawn can usually be used normally, so the project doesn’t feel like a continuous construction zone even though work is still technically in progress. Professionals may use bracing or temporary stakes to keep posts plumb while concrete hardens, which adds a visual reminder that the job isn’t done but doesn’t create additional mess.
Panel, Rail, and Gate Attachment
After curing, work shifts to attaching rails and panels, often racked or stepped to follow slopes, which mainly affects a narrow strip along the fence line instead of the entire lawn. Crews measure, cut, and fasten sections systematically, moving from post to post without needing to spread tools or materials far from the fence. This phase is less disruptive because there’s no digging, no piles of soil, and no heavy equipment rumbling around.
Gates are hung and adjusted last, often incorporating self-latching hardware where pool or safety rules apply, so this final phase adds function without major new digging. National pool safety guidance recommends at least a 4-foot barrier with self-closing, self-latching gates, and New York’s state pool rules summarize similar requirements. Professionals plan gate locations and hardware during the layout phase so everything aligns on the first try, avoiding callbacks that would require reopening sections of the fence.
Extra Protection for Complex Yards (Slopes, Pools, Wetlands)
Professional fence installers adapt methods for challenging sites so yards stay as intact as possible while still meeting safety and environmental rules. Complex terrain or regulatory constraints don’t have to mean weeks of disruption if the crew knows what they’re doing.
Handling Slopes, Pools, and Sensitive Areas
On sloped lots, racked or stepped fence designs reduce the need for broad grading, keeping disturbance close to the fence alignment rather than reshaping whole sections of yard. Racked panels follow the natural grade angle by angle, while stepped panels create a staircase effect with level sections between posts. Either approach requires more cutting and measuring but avoids heavy excavation or fill work that would spread mud and equipment tracks across your lawn.
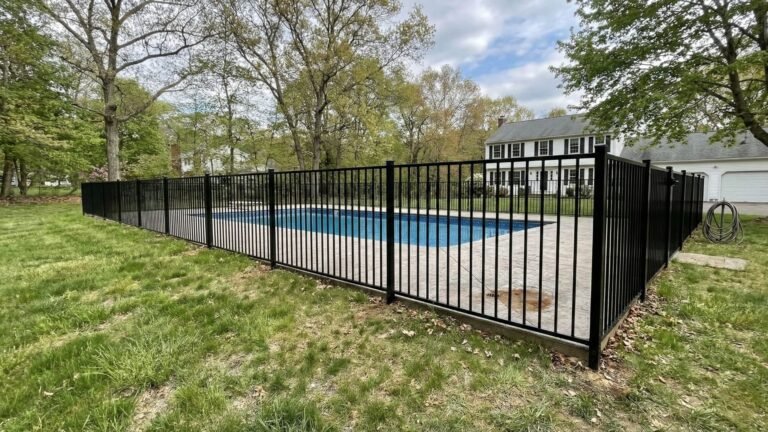
Pool barriers must meet national safety guidance and New York pool rules, typically requiring at least 4-foot-high barriers with self-closing, self-latching gates and controlled openings, which professionals plan so posts go in once and correctly. Gates must open outward from the pool, and picket spacing must prevent a 4-inch sphere from passing through anywhere on the fence. Meeting these requirements means careful layout and hardware selection, but when done right the first time, it eliminates the need to tear out sections and start over.
Finishing Touches and Yard Restoration
Professional crews finish with post caps, minor grading around the fence line, and removal of leftover soil or packaging, limiting tripping hazards and visual clutter. Standard project timelines include same-day cleanup, which means soil piles are hauled away, concrete bags are removed, and any excess hardware or cutoffs are collected before the crew leaves. That attention to detail transforms the site from “active jobsite” to “finished project” in a matter of hours.
Proper restoration also reduces erosion or drainage issues near pools, wetlands, or low spots that could otherwise lead to muddy, damaged sections long after the project. Professionals may add a light layer of topsoil or seed in areas where access routes crossed the lawn, and they’ll check for any ruts or compacted zones that need attention. This kind of care keeps your yard looking good year-round and prevents future maintenance headaches.
Permits, Utilities, and Rules That Prevent Do-Over Digging
Regulatory steps add some time on paper, but they protect homeowners from future disruptions, fines, or forced changes. Skipping these steps to save a day or two almost always backfires when a utility gets hit or a zoning officer issues a stop-work order.
Zoning, 811, and Code Coordination
Connecticut and New York building codes, adopted at the state and local levels, govern frost depth, structural support, and in some cases how close fences can be to property lines or rights-of-way. Local zoning departments interpret these codes and add their own setback rules, height limits, and special provisions for corner lots or historic districts. Professionals familiar with the local landscape know which towns require permits for any fence over 6 feet, which allow fences right on the property line, and which impose special rules near wetlands or conservation areas.
811 one-call systems and federal guidance require utility locating before excavation, helping to avoid dangerous strikes that could stop work and leave the yard unfinished. New York’s 811 system recommends calling several days before starting any digging project, and Connecticut has similar expectations. Hitting a gas line, electric cable, or fiber-optic run can shut down the job for days while repairs are made, not to mention the safety risks and potential fines. Professionals build this utility-locating step into their schedule so there’s no surprise delay once equipment arrives.
What Homeowners Should Expect and Do to Shorten the “Torn Up” Phase
Homeowners can materially shorten the time their yard feels disrupted by preparing access and aligning expectations beforehand. A little preparation goes a long way toward keeping the project on track and minimizing stress.
Daily Expectations During Professional Installation
Expect the loudest digging and most visible disruption on Day 1 along the fence line, with less intensive work (panel hanging, adjustments, and detail work) on subsequent days. Many projects follow a model where Day 1 is layout and post holes, Day 2 is post setting, and Days 3 to 4 are panels and gates. Knowing this sequence helps you plan around the noise and activity. If you work from home, you might schedule calls or meetings for later in the week when the crew is quietly hanging panels rather than running an auger.
For most Connecticut and New York residential projects, active on-site work is clustered into a 2 to 5 day window, with only a narrow band of the yard restricted once posts are set. During curing periods, your lawn is mostly usable again. Kids can play in the backyard, you can mow around the work zone, and you can go about your normal routine without feeling like you’re living on a construction site.
Tips to Minimize Yard Disruption
Before crews arrive, move furniture, toys, and landscaping items away from the fence path and identify gates or access routes to help limit back-and-forth traffic across the lawn. If your installer needs to bring equipment through a side yard or driveway gate, clear that path in advance so they don’t have to maneuver around obstacles or create a new route. The more direct and clear the access, the less wear and tear on your grass.
Confirm schedule, cleanup responsibilities, and final walkthrough expectations with the installer so that once work is complete, debris is removed and the yard is returned to safe, tidy condition without delay. Many installers include a walkthrough in their standard process, but it’s worth discussing up front what that looks like. Ask whether topsoil will be replaced, whether seed or sod is included for any damaged areas, and who’s responsible for hauling away excess dirt. Clear communication prevents disappointment and ensures everyone’s on the same page about what “finished” means.
Process Comparison Table: Simple vs. Complex Fence Install in Connecticut and New York
| Phase | Simple Install (Flat Backyard) | Complex Install (Slope/Pool/Sensitive Areas) |
|---|---|---|
| Prep & Layout | 4 to 6 hours: layout, 811 review, basic zoning checks | 1 day: added planning for slopes, pools, or buffers |
| Post Setting | About 1 day; posts below frost line, start curing | Up to 2 days; mixed depths and more complex footing layout |
| Panels/Gates | 1 day hanging panels and setting gates | 1 to 2 days racking/stepping and pool-grade hardware |
| Total Timeline | Roughly 2 to 3 on-site days in many Connecticut and New York yards | Roughly 4 to 5+ on-site days depending on site conditions |
This comparison shows how typical projects differ when terrain or regulations add complexity. The simple install is common for flat backyards with no special features, while the complex version applies when you’re dealing with slopes, pool barriers, or wetlands buffers. In both cases, the messiest phase is front-loaded, and once posts are set the yard starts feeling normal again.
Common Mistakes That Keep Yards Torn Up Longer
Skipping or delaying 811 calls can halt work if a utility is hit or not properly marked, leaving holes open and sections unfinished. Federal and state damage-prevention campaigns stress the importance of calling 811 well before digging starts. When a crew strikes a gas line or severs a cable, the project stops immediately, inspectors or utility crews arrive, and repairs can take days. During that time, your yard remains open and inaccessible, and you’re left waiting for clearance to resume work.
Rushing post curing or ignoring frost-depth guidance can cause leaning or failure, forcing crews back to reopen holes and disturb the yard again. When installers cut corners by setting posts too shallow or not allowing enough curing time, freeze-thaw cycles or settling soils will push posts out of alignment. Fixing those problems means digging everything up and starting over, which turns what should have been a one-time project into a multi-year headache.
Preparing Your Property for Professional Fence Installation in Connecticut and New York
Contacting 811 early, trimming branches along the fence line, and verifying approximate property boundaries all streamline the installation and reduce on-site time. Call 811 at least a few days before work is scheduled to begin, giving utility locators time to mark lines. Walk your property line with a tape measure or survey map to confirm where the fence will run, and flag any irrigation heads, sprinkler lines, or landscaping features that might not be visible from the surface.
Discussing local height limits, sightline rules, and any pool or wetlands constraints with the installer ensures the design is right the first time, avoiding mid-project redesigns. Local zoning codes vary widely, so what’s allowed in one town may be restricted in the next. A professional installer should be able to tell you what’s permitted, but it’s always smart to double-check with your town’s building or zoning department if you have questions. That extra step up front prevents the frustration of discovering halfway through the job that your design doesn’t comply.
Frequently Asked Questions About Professional Fence Installation
Q: How long will my yard look like a construction zone?
A: For many Connecticut and New York homes, the heavy-digging phase is usually limited to the first 1 to 2 days, with most projects finishing on-site within a 2 to 5 day window depending on length and complexity. Once posts are in and curing, activity is concentrated along the fence line, so the rest of your yard returns to normal use quickly.
Q: Do permits and 811 really affect my timeline?
A: Yes. Coordinating zoning approvals and utility marks before work starts prevents stop-work delays, fines, or redesigns that would extend how long your yard is disrupted. Skipping these steps to save a day or two almost always backfires when a utility gets hit or a zoning officer issues a notice to cease work.
Q: What should I expect on the first day of professional installation?
A: First days typically involve final layout verification, utility confirmation, and post-hole digging along the fence line, which is when your yard will look the most disturbed. Crews use string lines and stakes to confirm alignment, then excavate holes systematically, concentrating soil piles and equipment in a narrow corridor.
Q: How can I help the crew finish faster and keep things tidy?
A: Clear access, remove obstacles, secure pets, and confirm cleanup details so crews can work efficiently and restore the yard as soon as the fence is complete. Moving furniture and landscaping items away from the fence path and identifying gate access routes limits unnecessary traffic across your lawn, speeding up the project and reducing wear on your grass.
Final Thoughts
Professional fence installation in Connecticut and New York keeps your yard looking normal faster than most homeowners expect by concentrating heavy work into a short, well-planned window and respecting the regional codes that prevent future problems. When crews follow a clear sequence (layout and digging on Day 1, post setting on Day 2, panels and gates on Days 3 to 4), the “torn up” phase is mainly limited to the first day or two, and the rest of the project feels like assembly work along a narrow strip. Calling 811 before digging, checking local zoning rules, and allowing proper curing time all add small delays on paper but prevent expensive, disruptive do-overs down the road.
If you’re ready to move forward with a fence project that respects your time, your lawn, and your local codes, My Fence Guy can help you plan and execute a professional installation that gets your yard back to normal as quickly as possible. Contact us today to discuss your project, get a clear timeline estimate, and see how a well-managed installation can give you the privacy, security, or pool barrier you need without turning your property into a long-term construction zone.